Find command in Dos Prompt
Type in CMD link as: dir /s /b |find “Microsoft” (i.e., which sentence you want to search that sentence you just put on the double cots).
The network location cannot be Reached. For information about network troubleshooting, see Windows Help.
Solution:
Please find below solution If you face issue of getting above error message when accessing any network share through UNC path (e.g. Error! Hyperlink reference not valid.)
1. Run Registry Editor (regedit.exe), and check the following registry key:
[HKEY_LOCAL_MACHINE\SYSTEM\CurrentControlSet\Services\NetBT\Parameters]
2. Please find if the "TransportBindName" value exists. If either of them does not exist, create it. If either one is incorrect, change the data. The values should be like this:
Name: TransportBindName
Type: REGSZ
Value: \Device\
3. Under the same registry key ([HKEY_LOCAL_MACHINE\SYSTEM\CurrentControlSet\Services\NetBT\Parameters]), if you find the "SMBDeviceEnabled" value exists and is 0, it means Direct Hosting is disabled. You may change it to 1 to turn on it unless there are requirements that this should be disabled.
Name: SMBDeviceEnabled
Type: REG_DWORD
Value: 1
4. Go to Start--> Run--> Type Services.msc and make sure that " Computer Browser " and " Workstation " services are running.
This should resolve above error.
Remove write Protection on USB Pen drive or memory card or ipod
Trouble:
In the past we had received so many problems from the readers who have a problem in copying files on their USB portable devices like pen drives, memory card and iPod etc.

In this case lot of people facing this issue.
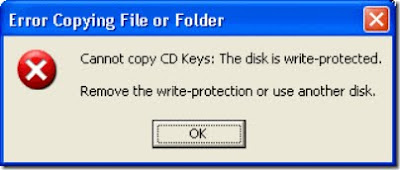
■Cannot copy files and folders, drive is write protected
■Cannot format the drive, drive is write protected
■The disk is write protected
■Remove write protection or use another disk
■Media is write protected
Some times people say that suddenly their drive become write protected and they are not able to delete any files and folder on the drive and also not able to copy new files and folder to USB portable drive.
Let’s see how can you remove write protection on your portable devices like pen drives, memory cards, iPod and other USB mass storage devices.
Fix:
Write Protection on any portable USB Device can be applied by the physical lock provided on the card adjuster or some times provided on the pen drives, so make sure to make your drive not write protected by moving the lock in right direction.
But even after moving the physical lock for write protection the problem can happen due to some virus action. This happens when some virus or script which applies the registry hack to make any drive write protect when connected to the computer, In that case follow the procedure below to remove write protection from your pen drive.
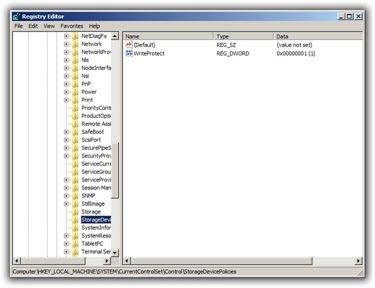
1. Open Start Menu >> Run, type regedit and press Enter, this will open the registry editor.
2. Navigate to the following path:
HKEY_LOCAL_MACHINE\SYSTEM\CurrentControlSet\Control\StorageDevicePolicies
Note: If the registry key StorageDevicePolicies key does not exist, you will need to create it
Download Enable it will be automatically enable your registry...
Download Disable it will be automatically disable your registry...

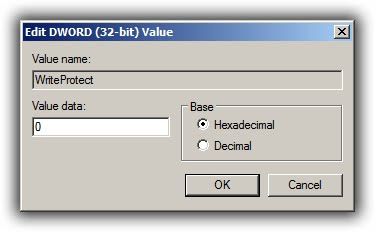
3. Double click the key WriteProtect in the right pane and set the value to 0 in the Value Data Box and press OK button

4. Exit Registry, restart your computer and then again re-connect your USB pen drive on your computer. That is it, done.
In the past we had received so many problems from the readers who have a problem in copying files on their USB portable devices like pen drives, memory card and iPod etc.

In this case lot of people facing this issue.
■Cannot copy files and folders, drive is write protected
■Cannot format the drive, drive is write protected
■The disk is write protected
■Remove write protection or use another disk
■Media is write protected
Some times people say that suddenly their drive become write protected and they are not able to delete any files and folder on the drive and also not able to copy new files and folder to USB portable drive.
Let’s see how can you remove write protection on your portable devices like pen drives, memory cards, iPod and other USB mass storage devices.
Fix:
Write Protection on any portable USB Device can be applied by the physical lock provided on the card adjuster or some times provided on the pen drives, so make sure to make your drive not write protected by moving the lock in right direction.
But even after moving the physical lock for write protection the problem can happen due to some virus action. This happens when some virus or script which applies the registry hack to make any drive write protect when connected to the computer, In that case follow the procedure below to remove write protection from your pen drive.
1. Open Start Menu >> Run, type regedit and press Enter, this will open the registry editor.
2. Navigate to the following path:
HKEY_LOCAL_MACHINE\SYSTEM\CurrentControlSet\Control\StorageDevicePolicies
Note: If the registry key StorageDevicePolicies key does not exist, you will need to create it
Download Enable it will be automatically enable your registry...
Download Disable it will be automatically disable your registry...

3. Double click the key WriteProtect in the right pane and set the value to 0 in the Value Data Box and press OK button

4. Exit Registry, restart your computer and then again re-connect your USB pen drive on your computer. That is it, done.
IEFix - General purpose fix for Internet Explorer
IE Fix- is a general purpose repair utility for Internet Explorer which repair Internet Explorer by registration it's core DLL files and reinstalls using the IE.INF file. More Information is given below.
Suitable for Windows 98/ME/2000/XP systems.
Requires Microsoft VB6 runtimes For windows98/ME systems
IE FIX Download as following IEFIX
Suitable for Windows 98/ME/2000/XP systems.
Requires Microsoft VB6 runtimes For windows98/ME systems
IE FIX Download as following IEFIX
MS office- cannot open word or excel file, the message 'memory error...' appears.
Problem: when open old word or excel documents quite often a 'memory error' appears. The cause might be an old file format or a corrupt office file.
Solution:
This is how to repair a office documents.
1. Open the application needed (word or excel)
2. Click on file-->open
3. Search for file you want to open
4. Mark the file
5. Click on the small arrow on the right hand side of "ok"
6. Choose "open and repair...."
Do the as above steps. I hope it will be working fine.
IEXPLORE.EXE- Application Error
I Received IEXPLOR.EXE
This instruction at " "07x71ab6afc referenced memory at 07x71ab6afc" This memory could not be "written"
Solution:
I took some correction regarding inability to use windows update i did the following re-register the update files.
Click Start and goto RUN, Type notepad in the openbox and click ok and paste as following commands into the new notepad Document
REGSVR32 WUPS2.DLL /S
REGSVR32 WUPS.DLL /S
REGSVR32 WUAUENG.DLL /S
REGSVR32 WUAPI.DLL /S
REGSVR32 WUCLTUX.DLL /S
REGSVR32 WUWEBV.DLL /S
REGSVR32 JSCRIPT.DLL /S
REGSVR32 MSXML3.DLL /S
then save as choose desktop destination and type the file name Registerupdate.Bat
then ok and exit notepad document, then goto Desktop double click as Registerupdate.bat and again re-update the windows files.
No need to Update again !!!
As this issue microsoft provided Hot fix. Click as below Link
IEError Hot FIX
Live meeting Error When you try to join a meeting "Launch.rtc"
Method 1.
Change the alternate path for Live meeting console
Fix it for me
To fix the Problem automatically, Just click as below link and save to your local computer and double click then Run.
Fix Live meeting Launch.rtc Error
Method 2.
Let me fix it yourself
To resolve this problem as following steps
1. Uninstall you Microsoft Live meeting console
2. Reinstall again Microsoft Live meeting as LIVE MEETING 2007
3. Create a batch file to change the alternative path for live meeting 2007
Copy the following text ino a notepad file, and then save it as Alt_Path.bat
@echo off
echo Setting alternate path for Live Meeting Console 32 bit edition
reg add "HKEY_CLASSES_ROOT\meet\shell\open\command" /ve /t REG_SZ /d "C:\Program Files\Microsoft Office\Live Meeting 8\Console\PWConsole.exe %1" /f
echo First Change Completed Successfully
reg add "HKEY_LOCAL_MACHINE\SOFTWARE\Microsoft\Windows\CurrentVersion\Internet Settings\5.0\User Agent\Post Platform" /v "MS-RTC S" /t REG_SZ /f
echo Second Change Completed Successfully
pause
For 64-Bit version of windows xp and Windows vista as below one.
@echo off
echo Setting alternate path for Live Meeting Console 64 bit edition
reg add "HKEY_CLASSES_ROOT\meet\shell\open\command" /ve /t REG_SZ /d "C:\Program Files\Microsoft Office\Live Meeting 8\Console\PWConsole.exe %1" /f
echo First Change Completed Successfully
reg add "HKEY_LOCAL_MACHINE\SOFTWARE\Microsoft\Windows\CurrentVersion\Internet Settings\5.0\User Agent\Post Platform" /v "MS-RTC S" /t REG_SZ /f
echo Second Change Completed Successfully
reg add " HKEY_LOCAL_MACHINE\SOFTWARE\Wow6432Node\Microsoft\Windows\CurrentVersion\Internet Settings\5.0\User Agent\Post Platform " /t REG_SZ /f
echo Third Change Completed Successfully
pause
Methed 3.
Associate the .rtc extension with the appropriate file
For Windows Vista user as following below methods
1. When you are prompted, manually save the launch.rtc file to your local hard disk drive.
2. Click the start, Click All Programs, Click Accessories, and then, Open windows explorer.
3. In the address bar of windows Explorer, Paste the following text, and then press Enter. (Control Panel\Program\Default Programs)
4. Click associate a file type or protocol with a program.
5. Locate the .rtc extension, and then select it.
6. click the change program button.
7. Click the Browse button, and then move to the following folder:
C:\Program Files\Common Files\microsoft shared\LiveMeeting Shared
8. If the list at the lower-right corner of the Open with box says Programs (*.exe; *.pif; *.com, ), change it to All Files (*.*).
9. Double-click Rtcrouter.dll, and then click OK.
10. Repeat steps 5 through 9 and replace .rtc with the .rtc-ms extension.
Click Close to close the file association box.
For Windows XP user
1. When you are prompted, manually save the Launch.rtc file to your local hard disk drive.
2. Right-click the Launch.rtc file, click Open With, and then click Choose Program to select the program that you want.
3. Click the Browse button, and then move to the following folder:
C:\Program Files\Common Files\microsoft shared\LiveMeeting Shared
4. At the bottom of the Open with box, click the list, and then make sure that All Files is selected in the Files of type list.
5. Double-click Rtcrouter.dll.
6. Click to select the Always use the selected program to open this kind of file check box if it is not already selected.
7. Click OK.
8. Repeat steps 2 through 7, and replace .rtc with the .rtc-ms extension.\
Method 4.
Delete the HKEY_CLASSES_ROOT\.rtc registry subkey
1. Uninstall the Live Meeting 2007 console.
2. Delete the HKEY_CLASSES_ROOT\.rtc subkey. To have us fix this problem for you, go to the "Fix it for me" section. If you would rather fix it yourself, go to the "Let me fix it myself" section.
Subscribe to:
Comments (Atom)